In this guide, I’ll walk you through automating the synchronisation between the lead status and lifecycle stage properties across different objects in HubSpot. We’ll focus on setting up workflows that ensure data consistency, provide valuable feedback loops, and enhance your reporting capabilities.
By the end of this guide, you’ll have a system that keeps your data accurate and up to date, helping your sales team work more efficiently and enabling better analysis of your lead management process.
The challenge
Managing lifecycle stages and lead statuses across contacts, companies, and leads can be complex, especially if you rely on reps doing this manually. Common challenges include:
- Data inconsistency: Without automation, lifecycle stages and lead statuses can become out of sync across objects.
- Inefficient processes: Manually updating properties is time-consuming and prone to errors (read: it won't happen).
- Poor reporting: Inconsistent data makes it difficult to generate reliable reports and gain insights.
- Lack of feedback: Without proper disqualification reasons, marketing teams don’t receive valuable feedback on lead quality.
The solution overview
We’ll set up workflows in HubSpot CRM to:
- Automate lifecycle stage updates: Ensure contacts and companies have accurate lifecycle stages based on defined criteria.
- Synchronise lead statuses: Keep lead statuses and disqualification reasons in sync between leads and contacts.
- Provide feedback loops: Capture disqualification reasons to help marketing optimise lead generation efforts.
- Maintain data integrity: Avoid creating data messes by carefully designing workflows.
We’ll accomplish this by:
- Turning off HubSpot’s default lifecycle stage automation.
- Creating custom workflows for setting and updating lifecycle stages.
- Setting up workflows to synchronise lead statuses and disqualification reasons.
- Implementing best practices to keep your data reliable and your processes efficient.
Video walk-through
Step-by-step guide
Step 1: Turn off HubSpot’s default lifecycle stage automation
1. Understand why you should disable the default automation
HubSpot’s default automation for lifecycle stages may not align with your customised definitions and processes. Disabling it allows you to have full control over how and when lifecycle stages are updated, ensuring consistency across your data.
By turning off the default automation, you prevent unintended changes to lifecycle stages, especially if you don’t want every associated contact to have a customer status or if you have specific criteria for each stage.
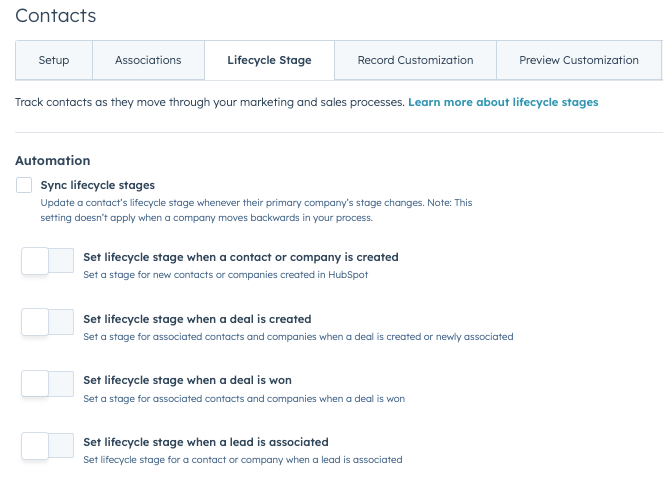
2. Disable the default automation
- Navigate to your HubSpot account and go to Settings.
- In the left sidebar menu, select Objects > Contacts.
- Click on Lifecycle Stage.
- Toggle off.
Step 2: Create workflows to set the initial lifecycle stages
Now, we’ll create workflows to set the initial lifecycle stages based on your criteria.
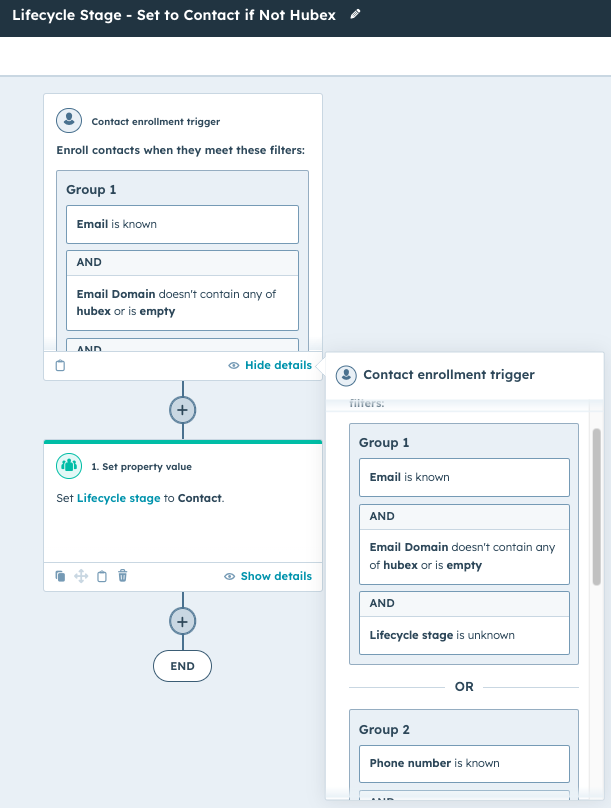
1. Create a workflow to set lifecycle stage to “Contact”
Definition: A “Contact” is someone you can reach out to via phone or email but who isn’t yet identified as part of your ideal customer profile (ICP).
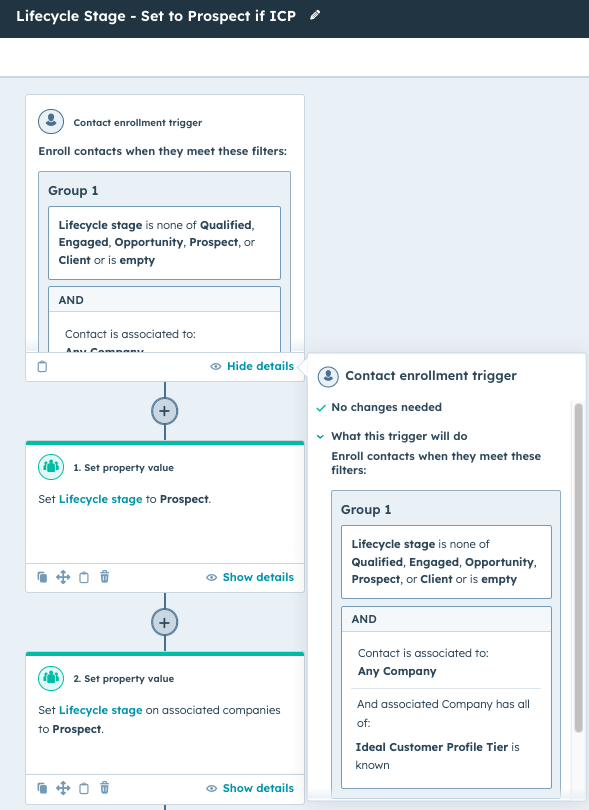
2. Create a workflow to set lifecycle stage to “Prospect”
Definition: A “Prospect” is a contact associated with a company that fits your ICP.
Step 3: Create workflows to update lifecycle stages based on engagement
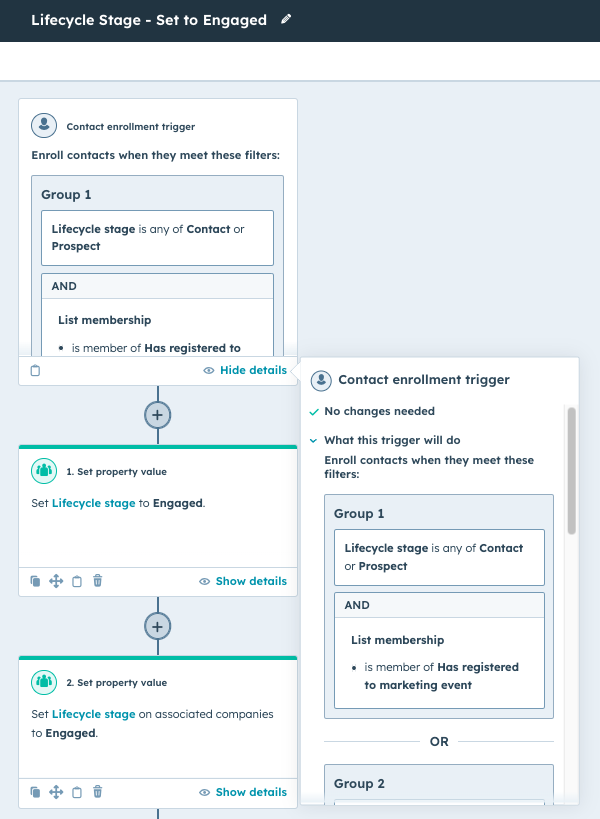
1. Create a workflow to change lifecycle stage to “Engaged”
Definition: Engaged: Contacts who have interacted with you, such as:
- Filling out a form.
- Attending a webinar.
- Replying to an email (marketing or sales).
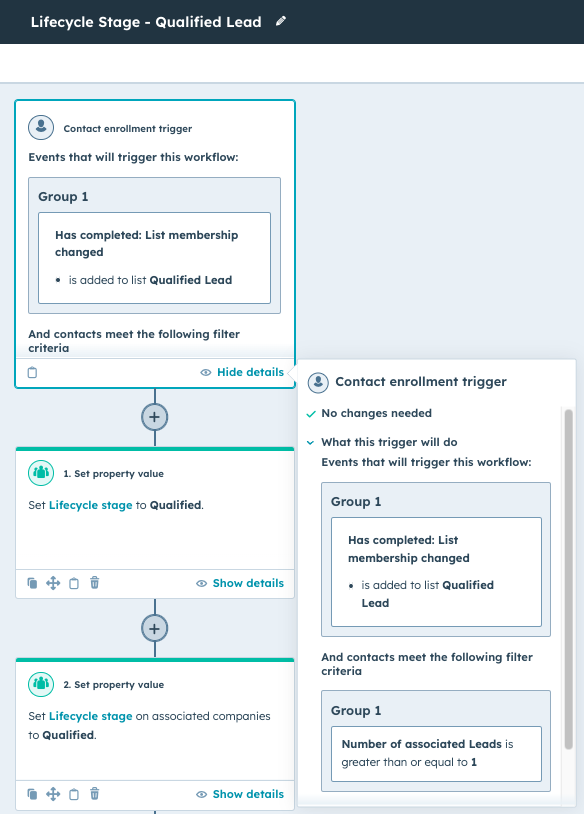
2. Create a workflow to update lifecycle stage to “Qualified”
- Definition: Contacts who have engaged further after initial sales outreach, indicating a higher level of interest.
- Define what “Qualified” means for your business (e.g., requested a demo, signed up for a trial). You can also use lists to group your contacts, as shown below.
Note: Align internally on the definitions of each lifecycle stage to ensure consistency across your team. And don't worry if your definitions are not the same as we've used here.
Step 4: Synchronise lead statuses between contacts and leads
The lead object in HubSpot can sometimes behave unpredictably, especially if it’s still in beta. To ensure lead statuses are synced properly, we’ll set up workflows that keep the contact and lead objects updated, no matter if the rep is using the Prospecting/Sales workspace or not.
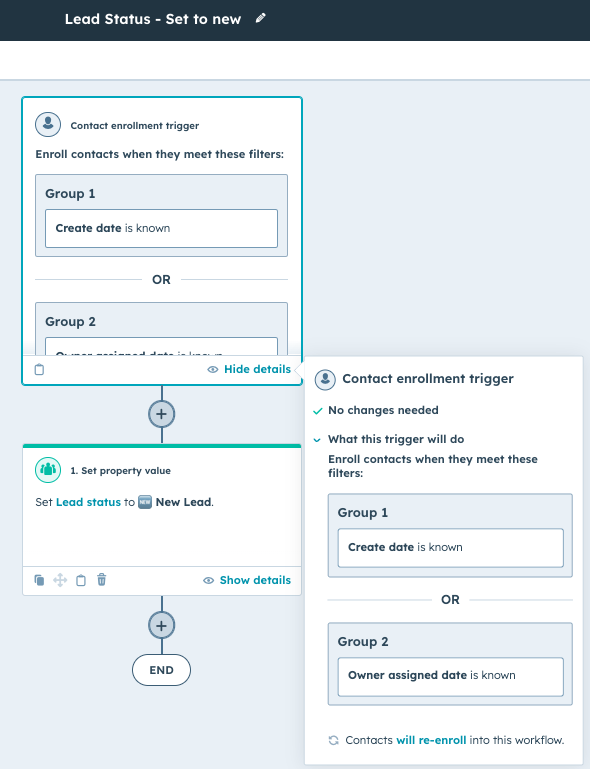
1. Create a workflow to set the lead status to New
2. Create a workflow to set the lead status to Reaching Out
This will allow us to keep track of what contacts we've engaged with and which ones are still waiting for us to engage.
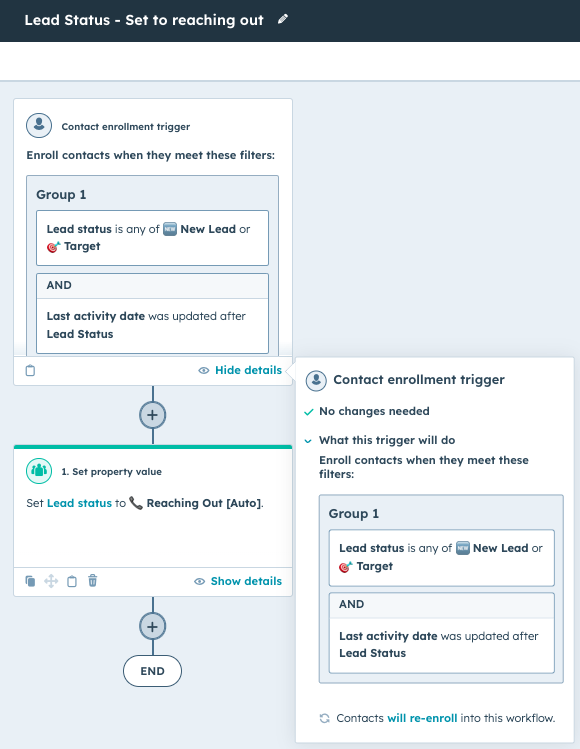
Note: I've added the [Auto] in brackets to remind the reps that they don't need to update this. To avoid confusion, always aim to make everything as self-explanatory as possible.
3. Create a workflow to set the lead status to Problem Identification
While you'd see most calling this stage "Connected", we prefer aligning it to our sales process. In this case, we're focusing on identifying if there is a problem-solution match:
- Does the prospect have a problem we can help solve?
- Is it a key priority for them to solve within the next 3-6 months (i.e., aligned with executive priority and metric)?
- Do they want help solving the problem?
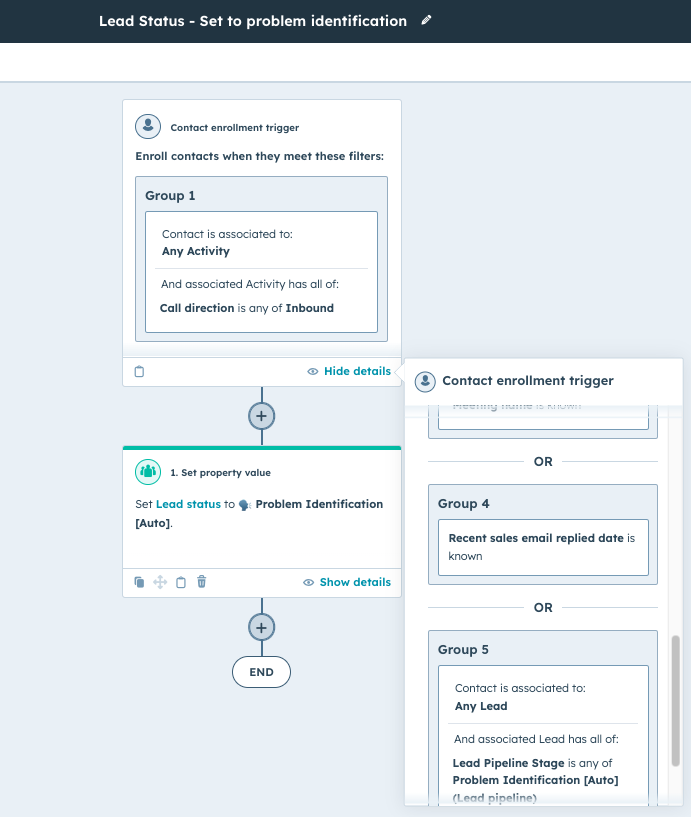
Note: Group 5 might seem like "playing it too safe" as the other triggers should already trigger the Lead Status. But, I generally prefer an additional layer to ensure the trigger works instead of spending time verifying every detail.
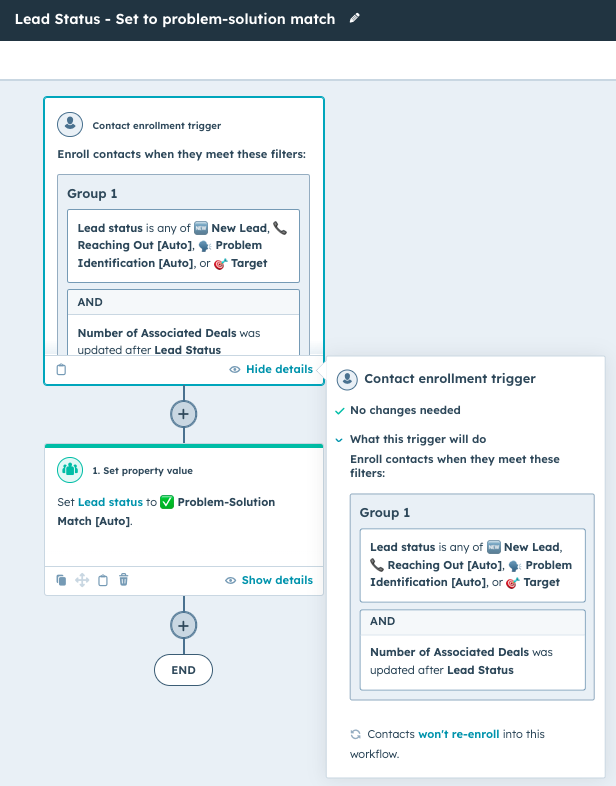
4. Create a workflow to set the lead status to Problem-Solution Match
This step will ensure that the Lead Status is updated to Problem-Solution Match (it meets our qualification criteria for creating a deal) when a new deal is created and associated with the contact.
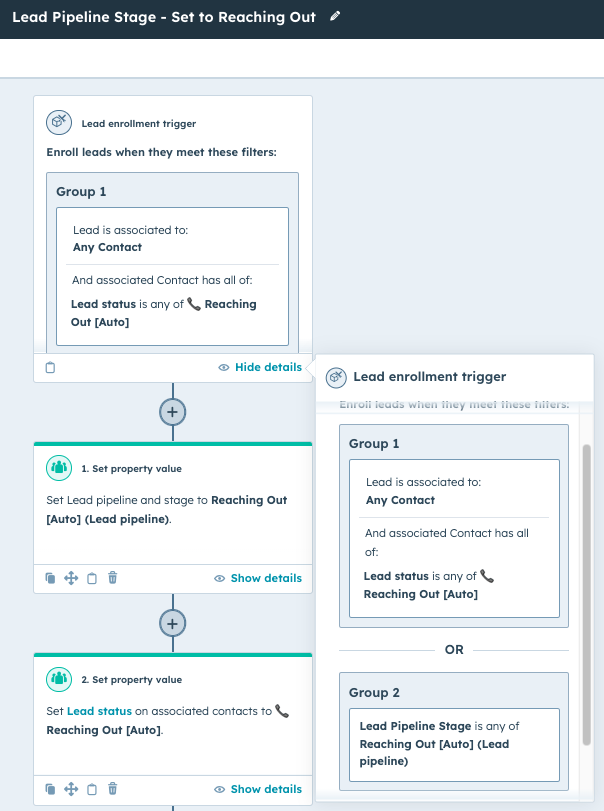
5. Set up workflows to sync the Lead Status information to the associated Leads Object.
1. Reaching Out sync
2. Problem identification sync
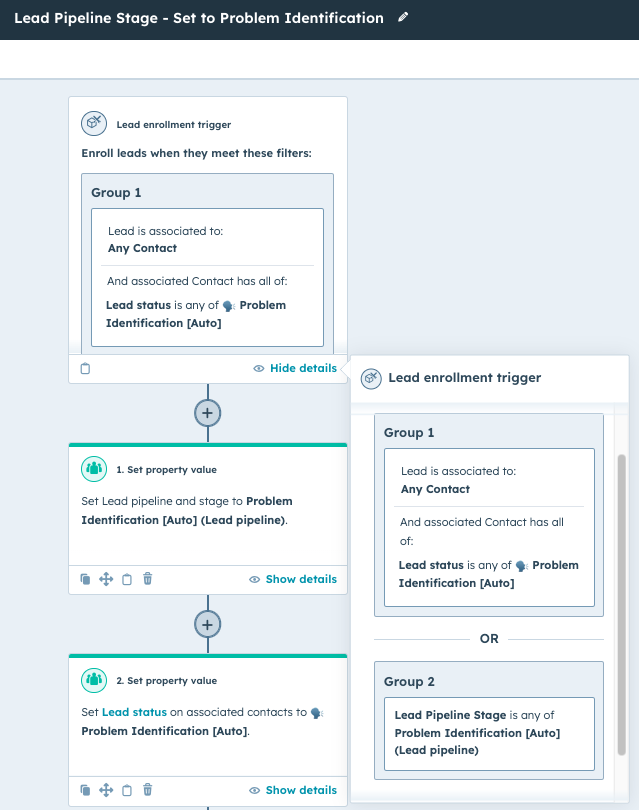
3. Problem identification sync

Step 5: Set up feedback loops for disqualification reasons
Capturing disqualification reasons provides valuable feedback to your marketing team and helps improve lead quality.
1. Create disqualification properties on contact and lead objects
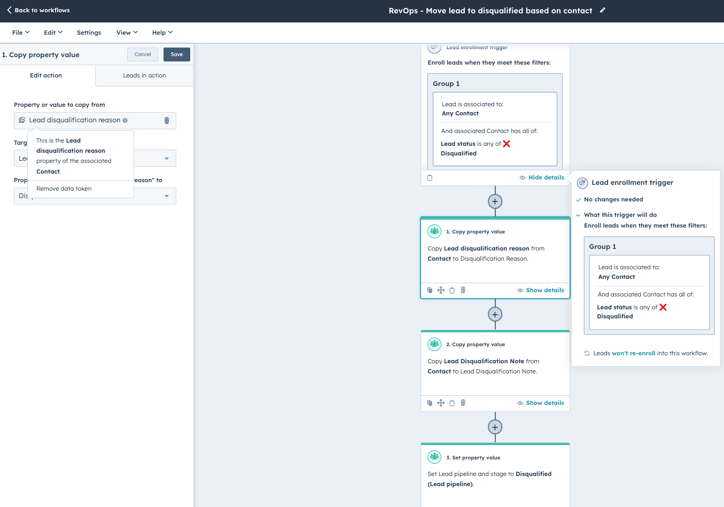
To ensure we capture disqualified leads, reasons, and additional context, we need one additional workflow. We're simply mirroring the information we have on the Leads Object and copying over the information from the Contact to the Lead if the Lead Status is set to disqualified.
2. Create a workflow to copy disqualification reasons from lead to contact
3. Utilise the feedback for optimisation
- Regularly review disqualification reasons to identify patterns.
- Collaborate with marketing to adjust campaigns, forms, or chatbots to reduce unwanted leads.
- Improve training and guidance for sales reps based on the feedback.
Best practices and considerations
- Keep stages simple: Use as few lifecycle stages and lead statuses as necessary. Overcomplicating can lead to unreliable data.
- Train your team: Ensure everyone understands the definitions and criteria for each stage and status.
- Be cautious with workflows: Incorrect workflows can create data messes. Always test workflows before activating them.
- Maintain data integrity: Regularly audit your data to ensure workflows are functioning correctly.
- Align internally: Agree on processes and definitions within your team to ensure consistency.
Up next…
In the next guides, I’ll continue our inbound lead management system setup:
- Actionable reporting and analytics: Learn how to build custom reports that provide actionable insights into your sales process and team performance.
- Scaling your lead management system: Explore strategies to adapt and expand your system as your business grows, ensuring continued effectiveness.


